- Since its introduction in 2014, the Yamane technique of two needle intrascleral haptic fixation has been increasing in popularity
- Possible complications associated with the technique include IOL tilt and decentration, conjunctival erosion, iris capture, vitreous hemorrhage, cystoid macular edema, vitreous traction and retinal tear
- I overview top tips to master the Yamane technique – including some of my own modifications
- Complicated cornea cases in which the technique has helped achieve good outcomes for my patients are presented.
The Yamane technique (sutureless needle-guided intrasceral IOL implantation with lamellar scleral dissection) was first published in 2014 by Shin Yamane of Yokohama University Hospital, Yokohama, Japan (1). Two years later at the ASCRS 2016 annual meeting, Yamane was awarded the Grand Prize for his video on the technique (available here). But in the years since Yamane’s technique was introduced, there have been several reports of complications – such as IOL tilt and decentration, and haptic erosion through the conjunctiva and sclera. Turnbull and Lash reported that there was an ‘ultrathin line’ between success and failure; the line turned out to be the need for an ultrathin wall 30G needle instead of a regular 30G needle (2). Here, I share my own experiences to help other surgeons when performing the technique.
My experiences with Yamane
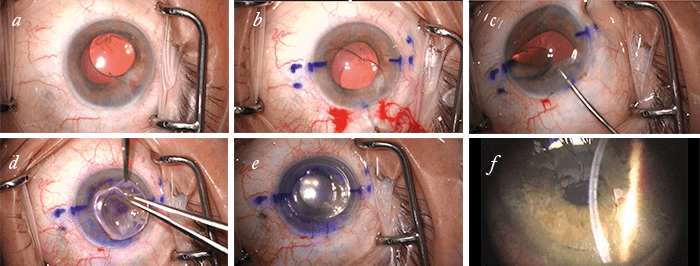
From my experience so far, I have found that there are some modifications that help me perform the surgery. The first thing is the initial marking (Figure 1). Using a toric marker, I mark 0 and 180° for the main incisions. I then mark 2 mm from the limbus and 2 mm down from my main incision, and 2 mm from the limbus and 2 mm from the second incision. I find these angles help make it easier to pass the haptics, especially the second one which can be tricky when you first start performing the procedure. Using the right lens and the right needle for the procedure is also important. We now have the CT-Lucia (Zeiss) available in the US (prior name EC-3 PAL); this is a 3-piece IOL with PVDF haptics that are very malleable and resistant. I find that the PVDF haptics create a much better flange than PMMA haptics, and can prevent erosion through the conjunctiva. I also find that the TSK 30G needle (available in Europe from TSK Laboratory Europe B.V. and in the US from Dermatologic Lab & Supply, Inc.) is best to use with the CT-Lucia (Figure 2). For IOL centration, a modification I have made is to control cauterization of the haptics. One thing I have noticed is that many surgeons just perform the cautery without knowing how much to cauterize on each side. Using calipers, I mark 1 mm on each side of the haptics, and when using cautery, I stop at that mark. Why 1 mm? Because we know from post-operative OCT that 1 mm of the haptics are needed to make a flange diameter of 0.3 mm – the perfect size for the scleral tunnel created by the 30G needle. If the eye’s anatomy needs a wider flange to ensure centration, you can just mark the haptic a little more on each side. Further things I have learned are to perform a really good anterior vitrectomy; you can use triamcinolone staining to make sure that there is no vitreous. Ensuring that you don’t pull the lens all the way when passing the first haptic is also helpful as it gives you space to work with the second haptic. I also find it easier to perform the procedure if I sit temporally rather than superiorly. Additionally, the ‘ideal’ lens for the procedure might not always be available to you. In one of my first patients, I used the MA60AC lens with PMMA haptics; I am monitoring them to see if they develop an erosion that might require a patch, but so far he has been doing great. I would say for these cases you must tell your patients, “No eye rubbing!”
In an email correspondence shared with the Cedars Aspens Group, Yamane advised the following, saying it takes four to five cases to master the technique: IOLs “I now use X-70 (Santen, Japan), which has 7 mm optics and PVDF haptics. You can use ZA9003 (J&J Vision) and MA60MA (Alcon).” Scleral tunnel “It is difficult to control the length of the scleral tunnel. I wanted to create a 2 mm length, however in most cases the lengths were about 1.5 mm as measured by OCT.” “Too short a scleral tunnel may result in IOL dislocation, and too long a tunnel may lead to intraoperative distortion of the cornea. A too small angle of the 30G needle can lead to this situation.” Haptics “You can control the length of the haptics by cutting down the longer side.” “Too small a flange has the risk of IOL dislocation (during wound healing). Too large a flange is difficult to be pushed into the scleral tunnel. If so, you should enlarge the entry site of the tunnel using the 30G needle.”
Application in corneal cases
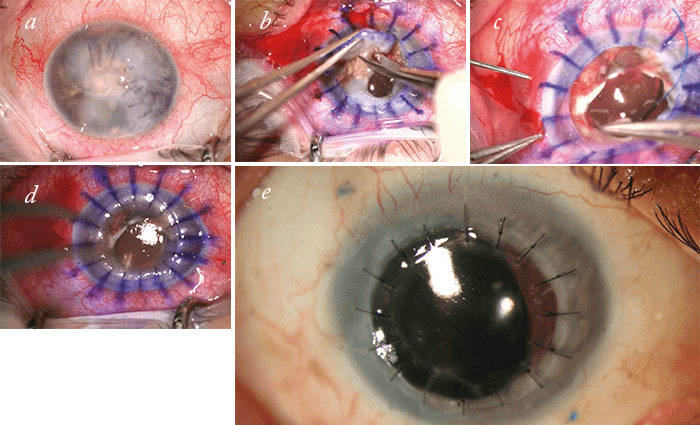
As a cornea specialist, I find the Yamane technique very useful. Here, I outline examples of complicated cases where it has really helped me – and my patients. Case 1 – Yamane technique and DSAEK This pseudophakic bullous keratopathy (PBK) patient had a complicated surgical history (Figure 3). They had an anterior chamber IOL, and had basically lost their cornea. For patients like this, it is much better to move the lens to the posterior chamber, otherwise there is always an increased risk of postoperative endothelial cell loss. You could perform a suture technique for scleral IOL fixation, but you’d need four needles to pass the sutures. Yamane is really great for these cases as you only need to pass two needles in the pars plana, then pass the haptics and you’re done. Five weeks after surgery this patient had a binocular distance-corrected visual acuity (DCVA) of 20/50.


Case 2 – IOL dislocation in PBK patient This PBK patient had a dislocated 3-piece IOL in the anterior chamber (Figure 4), and had a history of a complicated cataract extraction three years earlier. I first tried flipping the lens, as I didn’t know it was a PMMA lens, but it needed to be removed. A new lens was inserted using the Yamane technique – in this case, I only had the MA60AC lens – and a corneal graft applied. Twelve weeks after surgery, the patient was doing well, and had a DCVA 20/30. Case 3 – Ocular trauma This was a complex case of a Seidel positive patient who needed corneal sutures for a ruptured globe (Figure 5). But when I started to perform the full thickness transplant I discovered that they had a fibrosis, and that their lens was basically dissolving. Instead of leaving the patient aphakic, I was able to pass the needles and perform the Yamane technique, before finalizing with a full thickness corneal transplant.
Final thoughts
Yamane is an incredibly useful technique, and I have been very successful with it so far, especially with corneal cases. The small modifications I have made to the procedure have really helped me with my cases, and I hope they help other surgeons master the technique too! Karolinne Rocha is Director of Cornea & Refractive Surgery at the Storm Eye Institute, Medical University of South Carolina, Charleston, SC, USA.References
- S Yamane et al., “Sutureless 27-gauge needle-guided intrascleral intraocular lens implantation with lamellar scleral dissection”, Ophthalmol, 121, 61–66 (2014). PMID: 24148655. AM Turnbull and SC Lash. “Transconjunctival intrascleral intraocular lens fixation with double-needle and flanged-haptic technique: Ultrathin line between success and failure”, J Cataract Refract Surg, 42, 1843–1844 (2016). PMID: 28007120.
