- SICS is a sutureless cataract surgery that has multiple advantages over traditional phacoemulsification and ECCE procedures
- Not only is SICS the procedure of choice for international ophthalmology, it is useful when dealing with ‘catarocks’ – dense and mature cataracts
- Here, I explain the benefits of SICS and provide a step-by-step guide to performing the procedure
- Useful resources and training courses are highlighted to help any surgeon who wants to learn SICS.
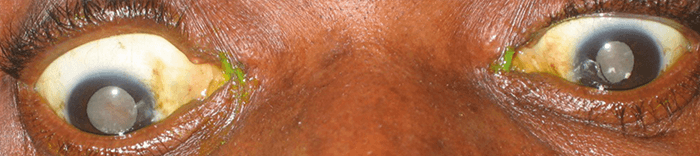
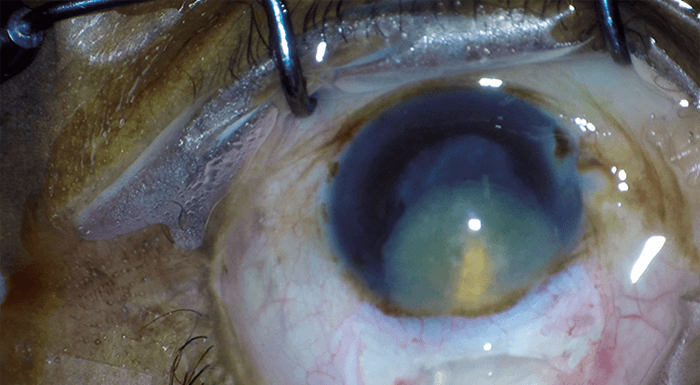
It is Friday afternoon at 4:59 pm, and the patient shown in Figure 1 walks through your door.
You are most likely to:
a) Refer!
b) Chop and phaco, with my favorite retina doctor operating that day in the next room
c)Extracapsular cataract extraction (ECCE), with an incision at the limbus and 15 interrupted sutures
d) Small incision cataract surgery (SICS)
Every cataract surgeon has come across the ‘catarock’, the super hard lens that requires prolonged phacoemulsification time and increased energy delivery to deal with – and the subsequent post-operative corneal edema. This can lead to extended healing times and occasionally further corneal surgery, such as Descemet’s membrane endothelial keratoplasty (DMEK) or corneal transplantation. To deal with this, most of us have learned to use a chopping technique with phacoemulsification, or to perform traditional ECCE with a large limbal incision – but this requires sutures and can induce large amounts of astigmatism. However, surgeons in many parts of the world perform “sutureless” SICS developed by Blumenthal and Ruit in the 1990s (1)(2). Its advantages over traditional ECCE and phacoemulsification include reduced cost, operating time, and post-operative corneal edema, a self-sealing scleral incision, and the need for less technology and equipment. In a comparative study, both SICS and phacoemulsification were shown to achieve excellent visual outcomes (3). SICS is an excellent procedure to perform, whether it is a planned surgery or a conversion procedure in cases where the lens is too dense to safely perform phacoemulsification, or when the capsule is broken and the lens needs to be removed in one piece. It is also typically the surgery of choice if one wants to work in international ophthalmology.
There are many paths open to the phaco surgeon who wants to learn SICS. Surgeons will often start out with articles and surgical videos that are easily found online, and then move on to a wet lab SICS course. After completing the wet lab, some will begin operating on patients, others will take a mentored course with an expert teacher who guides them through their first 20 or 40 cases via a teaching microscope or video screen and jump in when needed to ensure good outcomes. After the first 20 to 40 cases, the surgeon will often operate independently, but with a more experienced doctor working next to them on another microscope in the same room and available as needed. This is especially true in international ophthalmology, where the microscopes and operating room can be more challenging, in addition to the more advanced pathology often seen. It can take around 300 to 500 cases to become a fully confident SICS surgeon, but it’s a process worth doing. There are many references to begin learning about SICS (see Box: “Resources to get you Started”).
Free online references for SICS
- This website from Global Sight Alliance features videos on working in international ophthalmology and detailed lectures on the SICS technique. http://classroom.globalsight.org/
- In this video, Will Dean provides a nice overview of the technique. http://bit.ly/Will-Dean
- G Tabin and M Feilmeier. “Cataract Surgery in the developing world”, AAO Focal Points 2011 Module, eBook. Available at: http://bit.ly/Tabin2011
- BA Henderson. “Manual Small Incision Cataract Surgery”, First edition, Springer International Publishing: 2016. Available at: http://bit.ly/HendersonSICS
Paid wet labs for SICS
- Wet labs are held at the yearly meetings of the American Academy of Ophthalmology and the American Society of Cataract and Refractive Surgery, and at various times of the year with SEE International.
- This June at the Royal College of Ophthalmologists in London, UK, SEE is sponsoring a SICS wet lab featuring Geoffrey Tabin of the Himalayan Cataract Project, and this would be a great place to get started: https://www.seeintl.org/msics/london-june-2018/
- This is probably the hardest and most expensive to set up. As most have quite a wait time, it is best to start planning early.
- SEE International (under level 2 training): https://www.seeintl.org/msics/
- Vision Outreach International: http://visionoutreach.org/programs/msics-training
Step-by Step SICS
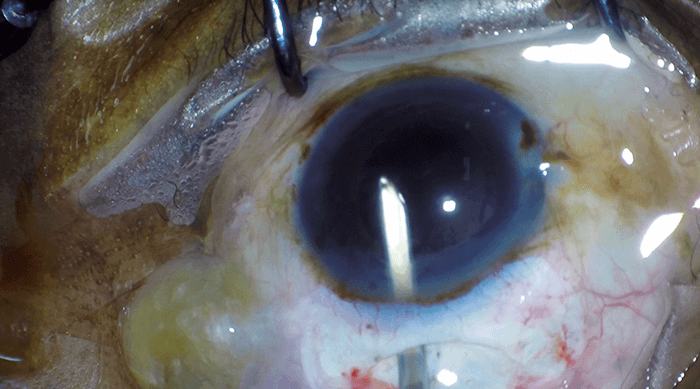
Surgeon position, bridle suture, conjunctival cutdown The patient is typically given a peribulbar block, prepped with an iodine-based antiseptic, and a lid speculum placed as with typical phacoemulsification. The characteristics of an “ideal first patient” are given in "Characteristics of an ideal first SICS patient" below. Most beginning surgeons sit superiorly. The advantages to this are the potential placement of a bridle suture under the superior rectus for better exposure, and coverage of the wound by the lid (Figure 2). Another option is a temporal approach that allows easier exposure and leads to less astigmatism, but less coverage of the wound. A compromise is sitting superior-temporally, which gives good coverage of the wound, but potentially less surgeon-induced astigmatism (4). The next step is the conjunctival cutdown made for approximately 6–8 clock hours down to bare sclera. Scleral bleeding can be controlled by cautery; many prefer wet field cautery, if available.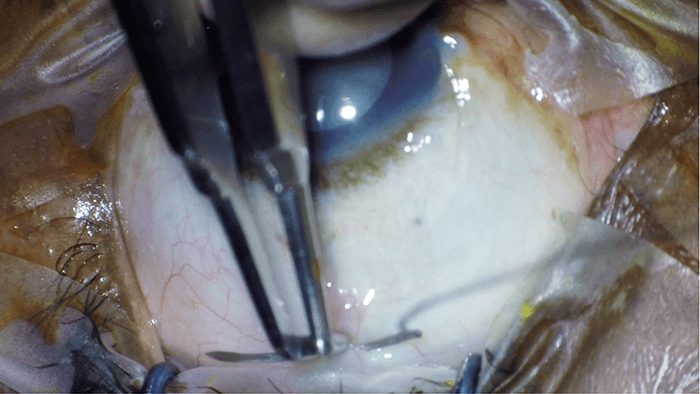
- Be able to communicate with the patient directly or through an interpreter
- Anxiolytic given
- Good block
- Lack of trauma, pseudoexfoliation, white, or super mature cataract
- Lack of deep set eyes or prominent brow
- Red reflex present
- Large pupil
- Vision blue and a quality viscoelastic present
- Sharp blades
- Wet field cautery
- Instruments and IOLs you are familiar with
- Decent microscope with a teaching arm for your scrubbed mentor
- It is good to know the microscope set up before you go on your first few international trips. If you need to source one, try to borrow one from a friendly non-governmental organization (NGO).
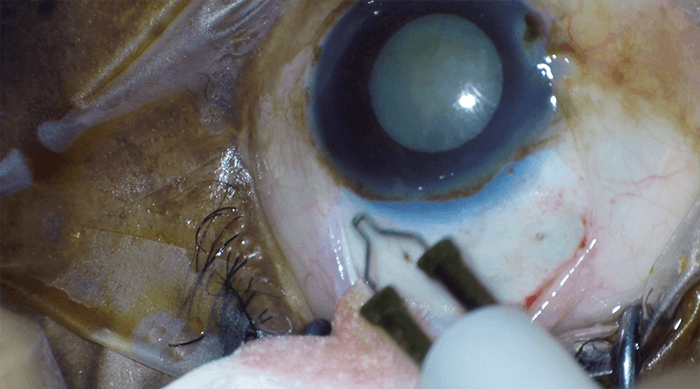
Scleral incision When first learning the procedure, it is best to measure and mark the size of the incision, but be aware this will vary greatly based on the size of the lens (Figure 4, these are the measurements recommended by Tabin and Feilmeier (5)). The initial scleral incision can be done with a 15 (or similar) blade or the crescent blade at 50–75 percent scleral depth. Another great option is a 250 µm depth guarded blade to get you started out at the right depth. It is helpful to get a good grip with .12 forceps and to have a dry scleral bed. If you do a frown incision you will reduce the amount of surgically induced astigmatism described by Bonnie Ann Henderson (6) (Figures 5 and 6), but it can be a little harder to do starting out. The crescent blade is then used to make a ‘wiggle’ incision that follows the shape of the globe. Continue the incision 1–1.5 mm into clear cornea but be sure to bevel up once clear cornea is reached to compensate for the increased curvature of the cornea. If the crescent blade is a) ‘buried in the incision’ peripherally and b) half the length of crescent blade centrally, it is usually the correct size. Figures 7 and 8 show tunneling up to clear cornea with the crescent blade. Notice that the blade is barely visible under the sclera, a sign of the correct 50–75 percent scleral depth. Centrally the scleral incision is also about half the length of the crescent blade, a sign it is about the correct length. Once the scleral incision is completed, a paracentesis (or two) is made (Figure 9), and viscoelastic or methylcellulose injected. A microkeratome blade is used to enter the anterior chamber. The microkeratome needs to be at the extent of the corneal scleral incision, and then aimed at the center of lens. If you see a dimple or a pucker, you have done it correctly (Figures 10 and 11). Some surgeons will make a single stab, then insert more viscoelastic and perform the capsulotomy. Others will make the full incision at this point. It is best to enter the anterior chamber and fully extend the incision with one cut on each side as it reduces the risk of a Descemet’s detachment – try not to ‘saw through’ if possible with a dull knife.
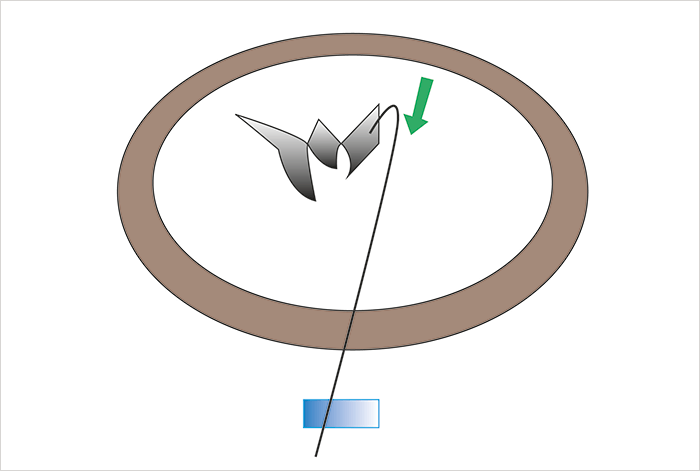
Capsulotomy The rest of the surgery is very much like traditional ECCE. You can perform a capsulotomy in many different ways: can-opener, continuous curvilinear capsulotomy (CCC), V-shaped capsulotomy, or linear capsulotomy. Most beginning surgeons will do what their mentor advises, and most seem to start out with a can-opener. The can-opener capsulotomy is often used because it is easier to perform under suboptimal conditions, such as a poor red reflex, an inadequate operating microscope, or a lack of vision blue stain. When doing a can-opener capsulotomy, it is good to remind oneself that the tear is made perpendicular to the puncture of the needle. To keep the tears extending peripherally, the needle should start distal and move toward the center of lens and connect new punctures to the last one (Figure 12). Many consider a CCC better if a red reflex is present and if it can be made to a large size (6–8 mm), as it has less tendency to extend peripherally and cortical removal is easier as there are no capsular tags to pull on. If it is too small it can be hard to get the lens out of the bag, or one can get a radial tear trying to force a too large lens through a too small CCC. One option if the CCC is too small is to make relaxing incisions on the anterior capsule. Another technique to know of especially in the presence of a small pupil is a V-shaped capsulotomy, which is done when two cuts on the capsule are made with the bevel of a 25 or 27-gauge needle in a V pattern. The two cuts meet, and the anterior capsular flap is then lifted up. The flap is then completed after the IOL is inserted. A more advanced technique is a linear capsulotomy.
Lens removal Prolapsing the lens into the anterior chamber can be performed in various ways and is often hard for a beginning SICS surgeon. One way is fluidic, via hydrodissection or viscodissection. Another is mechanical by dialing the lens completely out of the bag with a Sinskey hook. Once the lens is in the anterior chamber it is important to insert viscoelastic between the lens and the cornea and under the lens to push back the bag and iris to isolate the lens. Lens removal (Figure 13) through the scleral incision needs to be performed gently. Avoid forcing the lens through the incision as the capsule can be broken; you can always make the incision bigger and put in a stitch. The eye is typically pulled down with .12 forceps and most beginning surgeons use a lens loupe or irrigating vectis to remove the lens. It is also important to visualize the distal end of the lens loupe so that the distal end does not pull on the iris as well. Other techniques include using viscoelastic or the fish hook technique. Cortical cleanup is typically performed with a Simcoe cannula (Figure 14). Using your paracentesis incision (or even two paracenteses 180 degrees apart) will give beginning surgeons a more stable anterior chamber and easier angles compared to going through the main incision.
IOL insertion and wound closure Lens insertion is easiest with a three-piece acrylic lens, either by gently dialing it in with a Sinskey hook or dialing in the proximal haptic by supinating and then pronating the haptic into the bag with forceps. Due to the difficult visualization with some microscopes and/or a can opener capsulotomy, you typically try not to use one-piece acrylic lenses as complete visualization of the haptics into the bag can be difficult. You then remove the viscoelastic with a Simcoe cannula and hydrate all wounds. Most beginning surgeons place a suture to their scleral incision for their first few cases until they are comfortable with the security of their wounds. Conjunctival closure can be achieved with cautery, a stitch, or using the lid to reapproximate the conjunctiva. Most surgeons will then use intracameral antibiotics and subconjunctival steroids.
Why learn SICS?
Of the 36 million people in the world who are blind, 18 million of them are blind from cataracts (7). The cost of SICS can be as low as US $15 (8), with broadly similar outcomes to phacoemulsification. SICS is not only helpful to those looking to work in international ophthalmology but can also get you out of a difficult situation to achieve a good outcome in the clinic. SICS might not quite fit into the adage of “see one, do one, teach one,” but with a concerted effort and great mentors, it can certainly be learned to offer your patients with the hardest of cataracts another option that has been tried and proved the world over. M. Scott Hickman is an ophthalmologist at Ad Astra Eye in Lawrence, Kansas, USA. He is involved in volunteer ophthalmology in the developing world, and in 2016 became the medical director of SEE International in Santa Barbara, California, a charity providing eye care throughout the world. In 2017 he completed a Master’s degree in Public Health for Eye Care at the London School of Hygiene and Tropical Medicine.References
- M Blumenthal et al., “Small-incision manual extracapsular cataract extraction using selective hydrodissection”, Ophthalmic Surg, 23, 699–701 (1992). PMID: 1436973. S Ruit et al., “An innovation in developing world cataract surgery: sutureless extracapsular cataract extraction with intraocular lens implantation”, Clin Exp Ophthalmol, 28, 274–279 (2000). PMID: 11021556. S Ruit et al., “A prospective randomized clinical trial of phacoemulsification vs manual sutureless small-incision extracapsular cataract surgery in Nepal”, Am J Ophthalmology, 143, 32–38 (2007). PMID: 17188040. VK Mallik et al., “Comparison of astigmatism following manual small incision cataract surgery: superior versus temporal approach”, Neoal J Ophthalmol, 4, 54–58 (2012). PMID: 22343997. G Tabin and M Feilmeier. “Cataract Surgery in the developing world”, AAO Focal Points 2011 Module, eBook. Available at: http://bit.ly/Tabin2011. BA Henderson. “Manual Small Incision Cataract Surgery”, First edition, Springer International Publishing: 2016. RRA Bourne et al., “Magnitude, temporal trends, and projections of the global prevalence of blindness and distance and near vision impairment: a systematic review and meta-analysis”, Lancet Glob Health, 5, e888–e89 (2017). PMID: 28779882. P Gogate et al., “Why do phacoemulsification? Manual small-incision cataract surgery is almost as effective, but less expensive.”, Ophthalmology, 114, 965–968 (2007). PMID: 17296230.